
Got a DSLR For The Holidays?
7 Beginner Tips for Better Photos

You have a shiny, new DSLR camera and you want to use it beyond pointing and shooting. Here are some tips to help you get started!
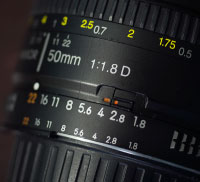 1. The real magic is in the lens. You probably got a kit lens to start out, but do yourself a favor and get a 50mm f/1.8 lens. For a prime lens (non-zoom), it’s pretty cheap, and the low aperture will produce beautiful portraits with a shallow depth of field (blurry background). On a full-frame sensor camera, the 85mm f/1.8 is also a great option. Both of these will perform well in low light.
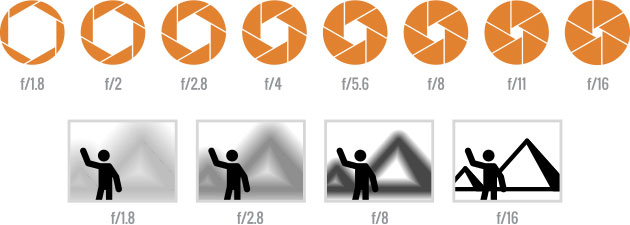
2. It’s okay to shoot in auto mode until you’re familiar with the camera. But you’ll need to learn a few exposure basics. Keep in mind the type of photo you’re taking: if it’s a portrait, set the aperture to a wide setting or smaller number. If you’re photographing a scene such as a landscape, you’ll want the opposite setting, which will make the entire scene sharp. From there, your shutter speed will speed up or slow down, depending on how much light is needed.
3. Use ISO to your advantage. You’ll want to keep your ISO as low as possible for clear, sharp images. But when you’re in a low-light situation, crank it up! It’s better to have grainy photos than blurry ones.
4. Stabilize your camera. To get tack-sharp, clear images, you’ll need to hold your camera steady or use a tripod, especially in low-light situations. Choose a tripod that’s durable enough to withstand the elements – you don’t want it to fall over with a gust of wind!
5. Shoot in RAW format. Raw images retain their original data, allowing you to easily adjust exposure, contrast, white balance, etc. The file size is much larger, but the image will remain uncompressed. Use a program such as Lightroom, Photoshop or Aperture for post processing.
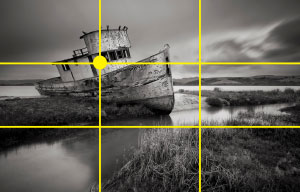 6. Remember the Rule of Thirds. Part of taking good photos is getting an interesting composition. Instead of placing your subject in the center of your shot, try dividing the frame into thirds and placing the subject on one of the intersections.
7. Absorb as much knowledge as you can. From composition, to exposure, to post-processing, there’s a ton of info to learn. Visit a book store and check out the photography books and magazines. There are plenty of resources online too – YouTube videos, Pinterest, Flickr and blogs.
Most importantly, have fun and happy shooting!
